- Checking the timing and spacing of your key poses.
- Adding detail, called "secondary" motion.
1.) Check Timing and Spacing:
You are trying to get any "kinks" out of the motion in your character here. The primary ones to look for are in the speed of the foot as it slides backward on our invisible "treadmill," the foot's angle as it slides, the height and rate of rotation in the hips, and the rate of rotation of the shoulders. Let's go through these one by one.
Motion of the Feet:
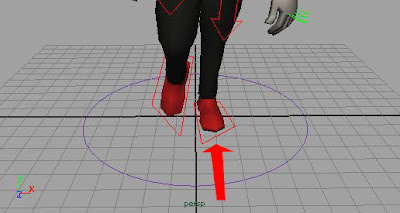
Upon landing in the Contact pose, the heel of the foot should move at a basically constant velocity until it lifts off the ground at the following Down pose. Look at the Translate Z axis in your Graph Editor for each foot. If you don't have a basically linear graph while that foot is on the ground, adjust it until the motion is constant.
Also pay close attention to the Translate X axis for each foot. While it is on the ground it may rotate slightly from the ball of the foot, but it will not slide left-to-right in a significant way until it leaves the ground:

Motion of the Hips:
The hips should be moving pretty smoothly, both in translation and rotation. The side-to-side and left-to-right torque of the hips may not form a perfect sine curve in the Graph Editor, but it will probably be close to one. Look at your Rotate Y and Rotate X channels in the Graph Editor. REMEMBER that on this rig, it is easiest to animate hip rotation on the Spine_Pelvis_IK control and hip translation on the Upper_Body control.
For the motion of the hips, pay special attention to the Translate Y channel of your Upper_Body control. This character has some odd proportions, so you may experience him "bottoming out" on the down pose very sharply, like what I showed you in class with my example. To fix this, you need to slightly raise the Contact pose and lower the Down pose until the motion is smoother. If you find yourself needing to raise / lower the hips in the Contact pose, remember to pay attention to the angle of the leading knee and adjust the leading foot position to keep that knee almost straight.
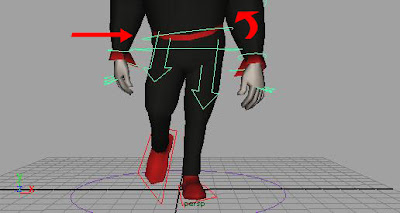
Bear in mind that the Rotate Z of your Spine_Pelvis_IK control should reflect the balance of your walk. As your character lifts one foot, weight transfers to the planted foot and the hips both rotate and translate to accommodate this weight shift. As the body moves towards the side with the planted foot, the hips will rotate accordingly, tilting the highest towards the planted side on the Passing pose:

Motion of the Shoulders:
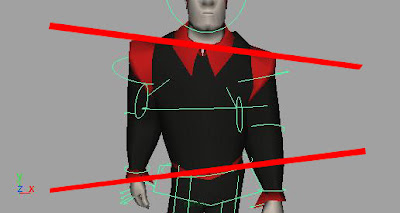
The shoulders should rotate in the opposite direction as the hips, both on the Rotate Y and Rotate Z axes. Remember the concept of contrapposto:

2.) Add Details (Secondary Motion):
This section we'll deal with together in class on Tuesday. It involves delaying the motion of certain body parts, like the arms, and adding extra keyframes to places like the feet and hands to give them an extra little something which really makes the animation come alive.
So, what I'd like you to shoot for this weekend is a semi-complete walk cycle, not just poses. Follow the examples I gave in class and here on the blog in these instructions and see what you can come up with. When we meet on Tuesday we'll bring it all together into a finished piece. You don't need to submit anything before class this time -- just get as far along as you can, and email me with questions!

No comments:
Post a Comment