Your first assignment for the semester is something of a warmup. You'll be animating two bouncing balls of differing weights and sizes interacting. "Interacting" can be taken to mean either physically touching one another in motion or both hitting another movable prop in motion, like the see-saw I showed you in class today, or knocking over columns, or walls, or other props. If you are unsure of how a ball would bounce, look for references! You must have access to at least one tennis / base / bouncy / bowling ball, or some time to search around on Youtube. A little reference can go a long way in this assignment.
Try to use the "blocking" / "layout" method I showed you for this assignment: focus on setting the most basic keyframes for all objects first (S to set a key on all attributes simultaneously), without worrying so much about their timing or the quality of their motion. Just try to get a plan laid out in advance. Once all the elements are represented, you can go back and begin changing your timing by dragging keyframes around in the graph editor (middle mouse button with the Translate Tool active) and adding additional layers of motion like squash / stretch and roll.
Shoot for a total length of between 3 and 6 seconds for this assignment. That means at 24 frames per second you would have a total run time of between 72 and 144 frames, but probably much closer to 72. This is just a suggested length though, not a rule. Adjust your time sliders accordingly when you begin blocking your animation.
Remember to use the Referencing system and Project Folder organization we've talked about in class. The previous two posts on this blog cover those in more detail if you've forgotten anything.
When you're all finished with your animation, archive your project folder with all the scene files in it. It shouldn't be over a megabyte or two, so attach it to an email and get it to me before class on Monday.
Wednesday, January 27, 2010
Tuesday, January 26, 2010
Referencing!
For most of the projects this semester you won't be animating directly in the file where your characters / props / whatever were created. You'll be animating in a new file which will contain references to all your assets.
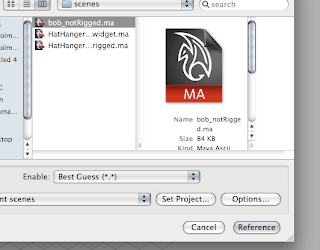
To make this happen, open up a fresh scene in Maya. Save it to your project/scenes directory with a descriptive name (something including "animation" or "anim" is a helpful way to distinguish it from a "rig" or "model" file), then go to File --> Create Reference... Find the file where you created and rigged whatever asset you are animating (a bouncing ball, a character, etc), and select it. Press Reference.

Viola! Your character appears in your new scene file, ready to go. The original file, however, is preserved intact and when you modify it in the future (painting weights, adding textures, adding more controls, etc) your animation file will automatically update!
Happy hunting.
To make this happen, open up a fresh scene in Maya. Save it to your project/scenes directory with a descriptive name (something including "animation" or "anim" is a helpful way to distinguish it from a "rig" or "model" file), then go to File --> Create Reference... Find the file where you created and rigged whatever asset you are animating (a bouncing ball, a character, etc), and select it. Press Reference.

Viola! Your character appears in your new scene file, ready to go. The original file, however, is preserved intact and when you modify it in the future (painting weights, adding textures, adding more controls, etc) your animation file will automatically update!
Happy hunting.
Sunday, January 24, 2010
Project Mangement!
Maya utilizes a particular "project" directory system to help you keep things organized. It's a great help when you start working with multiple files on a project and we'll be using it throughout the semester to stay organized.
In Maya, to create a project for your work go to the File menu --> Project --> New... A dialog will appear with a number of text fields for you to enter. Here you can determine the names of directories within your project and tell Maya where to store files of a given type by default. I recommend that, instead of entering any of your own directory names you simply press the Use Default button at the bottom of the dialog. Notice that Maya fills in all those text fields for you now, greatly simplifying the process.

Now enter a name for your project in the uppermost field. Feel free to use whatever name you would like, but try to make it descriptive, like "jed_assignment_1" or "jed_ball-bounces" or something. Putting your name in the title is a great way to keep me from losing your files. Finally, choose a location for your project by pressing the Browse... button and save it to wherever you like.
However you choose to name things, when you have a working project directory you should be able to save files to it. By default now when you save a file it will go to your project/scenes directory. Very convenient! When you sit down at a new computer though, Maya won't necessarily know what project it should be working within, so you'll have to tell it. From now on, every time you open a copy of Maya for the first time that day you should go to the File --> Project --> Set... command and choose your project directory from the browser dialog which pops up to point Maya in the direction of your files.
When you submit files to me after this you'll want to make a .zip copy of the entire project directory.
In Maya, to create a project for your work go to the File menu --> Project --> New... A dialog will appear with a number of text fields for you to enter. Here you can determine the names of directories within your project and tell Maya where to store files of a given type by default. I recommend that, instead of entering any of your own directory names you simply press the Use Default button at the bottom of the dialog. Notice that Maya fills in all those text fields for you now, greatly simplifying the process.

Now enter a name for your project in the uppermost field. Feel free to use whatever name you would like, but try to make it descriptive, like "jed_assignment_1" or "jed_ball-bounces" or something. Putting your name in the title is a great way to keep me from losing your files. Finally, choose a location for your project by pressing the Browse... button and save it to wherever you like.
However you choose to name things, when you have a working project directory you should be able to save files to it. By default now when you save a file it will go to your project/scenes directory. Very convenient! When you sit down at a new computer though, Maya won't necessarily know what project it should be working within, so you'll have to tell it. From now on, every time you open a copy of Maya for the first time that day you should go to the File --> Project --> Set... command and choose your project directory from the browser dialog which pops up to point Maya in the direction of your files.
When you submit files to me after this you'll want to make a .zip copy of the entire project directory.
Welcome Home.
Hello class!
This blog will be your new home-away-from-class for the next 3.5 months. Come here any time you don't remember what was assigned/when it's due, or when you want to ask a question for the whole class to see. You should feel free to post works in progress (WIPs) in the comments section, as well as discuss amongst the group. I encourage everyone to add the blog + comments to their RSS feed, but if you don't use such things I will email out any major posts when they are made. If you need to review material from last semester I recommend reading over the Art374 blog. All the intro assignments are still up there and waiting to refresh you on basic concepts.
Assignments will all be turned in via email by midnight of the night before they are reviewed in class. So if an assignment is due on a Monday, you should get it in to me by Sunday at 11:59 for full credit. You should send a zipped project folder containing all your models/textures/rigs/sets/whatevers to me at jedmitchell@art.umass.edu.
At some point your project folders will probably get too large to send via email and I'll set up an FTP server for uploading to, but that won't happen for several weeks. In the mean time, everyone have fun diving back into Maya!
Jed
Subscribe to:
Comments (Atom)
