Thursday, March 25, 2010

Sound

For those of you starting on animation for the group project, I have exciting news! Sound files! Well, maybe that's exciting. They will certainly make timing your animation easier though.

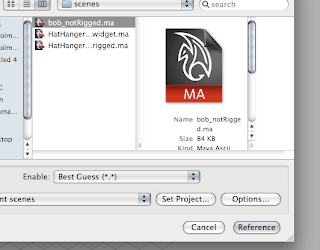
To add a sound file to your Maya timeline, first go to File --> Import... and then simply choose the appropriate sound file. The archive I'm linking you to here includes most (but not all) of the shots from our project divided into individual wav files. Select the sound appropriate to your shot by number. Once it is imported you'll notice that... wait, nothing happened.

To actually do something with your imported sound file, you must right click on the timeline. The resulting menu includes a Sound submenu. In that submenu you will see the sound file you imported in the last step:
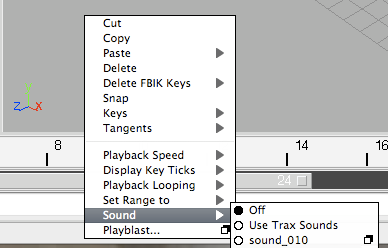
Simply click it in this menu to add it to your timeline. Presto! You will now here sound playing back when you play your animation, and audio will appear in any playblasts you make. You will also get a handy-dandy waveform graphic drawn across your timeline:
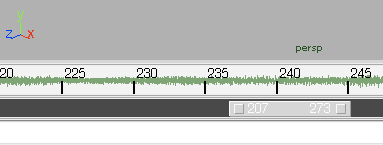
Isn't that great? And that's all there is to it. Once again, here is a link to that archive of sound files. Good hunting!

Tuesday, March 9, 2010

New Design Sheets: Color!

Here are the complete "variation" designs for the chicks being made by the modeling + texturing team:


And a more detailed look below (click to see full size, right-click to save as):

Note that these chicks all share exactly the same geometry and UVs (including their beaks and legs). They simply have some different body proportions. In fact, though my drawings are hardly perfect, they will all share the same leg dimensions as well. Rigging for these guys should be pretty easy because of that, and making all the variations won't take an exceptional amount of time either. The various eggs should all be colored and shaped vaguely to match their resultant chicks.

Wednesday, March 3, 2010

Group Project! Überduck!

I think we're just going with Evan's working title for our project: Überduck. Titles shmitles.

Okay, I'm going to use this space to post as much material for the project as I can. Some of it I'll have to make custom for each of your tasks, but this general info should be useful to everyone.

Layout

We have 11 total shots in our project right now, five of which are FX shots and don't need to be accounted for at the outset. My numbering convention may also look odd at first: I'm tagging an extra zero at the end of each shot number for reasons I will explain to anyone who is interested in class. Duration is marked as "Seconds.frames", and it's based on 24 frames per second. So, including those FX shots, this is what our film's timeline looks like:

### :: Duration :: Description

010 :: 16.12 :: Titles + truck back to nest
020 :: 05.02 :: Medium of first eggs cracking
030 :: 04.23 :: Long shot of eggs emerging
040 :: 10.02 :: Medium of überduck egg cracking + initial abuse
050 :: 03.04 :: Medium of first egg rumbling before level up
060 :: FX shot :: LVL UP!
070 :: 03.00 :: Medium of second egg rumbling before level up
080 :: FX shot :: LVL UP!
090 :: FX shot :: LVL UP!
100 :: FX shot :: LVL UP!
110 :: CANCELLED -- it was an extra while I worked on the animatic.
120 :: 05.02 :: Medium of chicks everywhere; continued abuse; überduck ready to level up
130 :: FX shot :: LVL UP! LVL UP! LVLLLUUUUUUPPPP!!!
140 :: 05.02 :: Crane down to long shot from above; überduck SMASH!

For those of you working on layout, I highly recommend sharing some assets. One of you might make a dummy of the set, and another a dummy of the ducklings. Share these things instead of needing to make your own! Also, remember the common settings for cameras:

Resolution: 1280 x 720 (HD 720 in the Render Settings presets)
Focal Distance: 50mm
From your view panel's "View" menu: Camera Settings --> Resolution Gate √


Modeling

First and foremost, DON'T GO OVERBOARD WITH DETAIL. Not in week 1, anyway. Stay as low polygon count as you can: if the shape you are making (be it a leaf, a beak, or a nest) can be described with 10 polygons, don't use 100 to do the job. It will bite you later on, I promise.

Stick with basic shapes for now. That means a clean polygon layout and a focus on the way the silhouette reads from primary angles. If you're modeling leaves or trees or other set elements, we will only see the objects from one angle in this film, so don't bother detailing them! Even the chicks + eggs will be seen primarily from the front and side, so going into massive detail on their behinds will be unnecessary.

If you are working on related assets, talk to each other. Those of you working on various duck-parts will want to share your files and take the best from each other when constructing the final version. Those of you working on the set should communicate as well and share your early work to help the others. Use the group email: companim1@googlegroups.com. Trust me, having everyone see your work is a good thing.

A final note for modelers: last semester we got into the habit of combining meshes to make complete objects. DO NOT DO THAT YET. In the early stages of modeling, we want things separated into as many objects as possible to facilitate quick revisions. When the time comes, everything will start merging into finished pieces.

Links!

And now, some links.

The animatic:
http://www.jedmitchell.com/animatic_03-03-10_H264.mov

Model sheet for the ducks:
http://jedmitchell.com/chickSheet.jpg

"Model" sheet for the ENV:
http://jedmitchell.com/LakeForestSheet.jpg

I will also be sending out an archive of designs from the storyboards and other sketches as the week moves forward, and a link to that collaborative spreadsheet I showed in class so you can fill in your work as you complete it. My apologies for not having all this ready to go at class time; it's been quite a week...

Very Exciting! Try to get your portion of the work done for class on Monday and we'll go with round 2 of assignments from there!

Thursday, February 18, 2010

Jump

This assignment concerns the "jump" action. Your jump can be of any sort, but I want you to keep it simple: that means no running, no jumping off of cliffs, no crazy ninja backflips. Just a jump. Straight up, forward, backward, with skill or clumsily, for joy or in surprise, but just a standing jump + landing.

Almost every type of action we can classify as a "jump" shows certain shared key movements, or "beats". These are described as:

Rest 1
This is your starting pose. It's not very complex, but it's necessary to begin your animation this way. I suggest paying attention to where your feet are in the rest pose so that you don't have to shift them to get into...

Compression 1
This is the "squash" part of our jump / bouncing ball analogy. Depending on the type of jump you are doing, this pose may be very exaggerated like mine, or it may be quite subtle, such as a simple bend of the knees and shift of the arms.

Extension (optional)
This is the "stretch" part of our jump / bouncing ball analogy. Keep in mind that the extension doesn't necessarily include the whole body; you're not stretching your character out on the rack. Power for a jump comes from the toes, up through the legs, into the hips, and out through the torso. The arms are there primarily to aid in generating momentum / balance, even in a small or clumsy jump. I label this pose as "optional" because if you are doing a smaller jump, the extension pose may be easily confused with the...

Float
The float pose comes at the very top of the jump, when your character's momentum has reached equilibrium with gravity. A high, athletic jump like mine has a very pronounced float, in which my character is reaching for something, so his arms are at their highest point here. A more subtle jump may not do much with this pose, but you need to describe the height of the jump somehow.

Contact (optional)
This is the moment of impact after a high jump, when the character is searching for balance right before landing. The primary use for this pose is in determining body position before the legs take on weight again, but it is also optional because in a smaller jump the character might have a very soft landing and fall straight into...

Compression 2
The second compression will almost certainly be weaker than the first, just like the second squash on a bouncing ball, which has lost some of its energy from the first bounce. Balance is the main thing to decide here: does your character fall over after landing? Sprain her/his ankle? Spring back into another jump? Pose triumphantly? The resulting angle of descent between the float and compression 2 poses determines what happens next in the...

Rebound
This pose may be barely noticeable if your jump is very low, but it is absolutely essential. Also, called a "settle" sometimes, this pose gives the necessary reciprocation after compression 2. Without it, your landing will feel weak or outright false.

Rest 2
Finally, a return to rest. You need this just to close off your animation. In a more complex action, this pose might not happen: the character might jump again or run off screen, or who knows what else. But none of those are options for you this week, so keep it simple and let him rest at the end!

For the reference we used in class, see this youtube link:

http://www.youtube.com/watch?v=tXKCiaJsn8Q

Or to download a higher quality copy, try this link:

http://www.jedmitchell.com/jump_ref.mp4

If you are doing a less athletic jump, or a different style, get some more reference, youtube is full of the stuff! I applaud originality, but while you are still learning the ropes, reference can make the difference between pass and fail, so go find some! Or shoot some yourself. Or draw it. However you do it, go out and study some jumps before getting started on this assignment. Research up front will make a world of difference in the end.

By Monday, I would like you to have a new project directory to give me, with at least 6 poses (the extension and contact poses may not be necessary if you are doing a lower or less athletic jump) in your scene file.

Wednesday, February 10, 2010

Finishing the Walk Cycle

Completing your basic walk cycle will entail two main ideas:
  • Checking the timing and spacing of your key poses.
  • Adding detail, called "secondary" motion.
You saw me work on #1 a bit in class on Monday, but because of the snowday on Wednesday you didn't get the full demonstration, nor have you seen the process for adding secondary motion to your walk. I will try to explain #1 as clearly as possible here, and if you can begin working out that point, we can address #2 in class on Tuesday, where we will finish this assignment together.

1.) Check Timing and Spacing:

You are trying to get any "kinks" out of the motion in your character here. The primary ones to look for are in the speed of the foot as it slides backward on our invisible "treadmill," the foot's angle as it slides, the height and rate of rotation in the hips, and the rate of rotation of the shoulders. Let's go through these one by one.

Motion of the Feet:
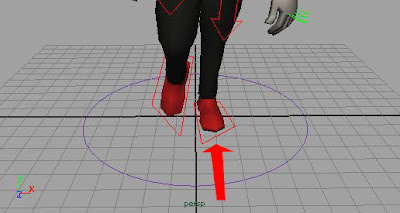
Upon landing in the Contact pose, the heel of the foot should move at a basically constant velocity until it lifts off the ground at the following Down pose. Look at the Translate Z axis in your Graph Editor for each foot. If you don't have a basically linear graph while that foot is on the ground, adjust it until the motion is constant.

Also pay close attention to the Translate X axis for each foot. While it is on the ground it may rotate slightly from the ball of the foot, but it will not slide left-to-right in a significant way until it leaves the ground:


Motion of the Hips:
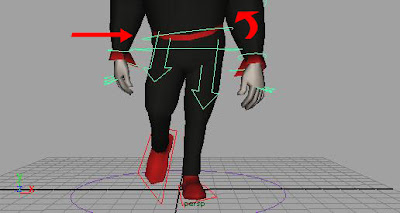
The hips should be moving pretty smoothly, both in translation and rotation. The side-to-side and left-to-right torque of the hips may not form a perfect sine curve in the Graph Editor, but it will probably be close to one. Look at your Rotate Y and Rotate X channels in the Graph Editor. REMEMBER that on this rig, it is easiest to animate hip rotation on the Spine_Pelvis_IK control and hip translation on the Upper_Body control.

For the motion of the hips, pay special attention to the Translate Y channel of your Upper_Body control. This character has some odd proportions, so you may experience him "bottoming out" on the down pose very sharply, like what I showed you in class with my example. To fix this, you need to slightly raise the Contact pose and lower the Down pose until the motion is smoother. If you find yourself needing to raise / lower the hips in the Contact pose, remember to pay attention to the angle of the leading knee and adjust the leading foot position to keep that knee almost straight.

Bear in mind that the Rotate Z of your Spine_Pelvis_IK control should reflect the balance of your walk. As your character lifts one foot, weight transfers to the planted foot and the hips both rotate and translate to accommodate this weight shift. As the body moves towards the side with the planted foot, the hips will rotate accordingly, tilting the highest towards the planted side on the Passing pose:


Motion of the Shoulders:
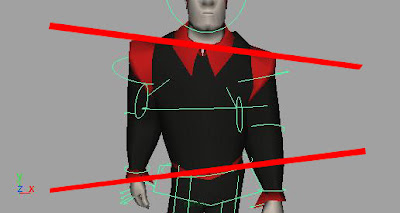
The shoulders should rotate in the opposite direction as the hips, both on the Rotate Y and Rotate Z axes. Remember the concept of contrapposto:


2.) Add Details (Secondary Motion):
This section we'll deal with together in class on Tuesday. It involves delaying the motion of certain body parts, like the arms, and adding extra keyframes to places like the feet and hands to give them an extra little something which really makes the animation come alive.

So, what I'd like you to shoot for this weekend is a semi-complete walk cycle, not just poses. Follow the examples I gave in class and here on the blog in these instructions and see what you can come up with. When we meet on Tuesday we'll bring it all together into a finished piece. You don't need to submit anything before class this time -- just get as far along as you can, and email me with questions!

Thursday, February 4, 2010

Walk Poses

You all received your assignment in class on Wednesday, but as a written reminder for anyone who wants it, these are the specifics:
  • Create the 8 poses of a basic, mechanical walk cycle (r.contact, down, passing, up, l. contact, down, passing, up, as documented in the "walks.pdf" handout you all received via email) using the male or male_V rigs provided here on the blog.
  • The walk should be "in place," as though happening on a treadmill.
  • Use Stepped Keys for your keyframe tangents so that the poses are not interpolating between frames (remember that you can set this as your default type in Windows --> Settings/Preferences --> Preferences --> Animation).
  • Focus on the motion from the side view of your walk.
  • You are not required to add any motion to the hands for this assignment.
Remember to use REFERENCING and the PROJECT directory system. I'm not taking points off for this yet, but I will be soon. Archive your project directory and mail it to me before class on Monday, or hand it in that morning via thumbdrive, etc (I carry one if you need to borrow it).

Monday, February 1, 2010

Your New Best Friend

In advance of your walk-cycle-poses assignment, I am posting this character file for you to begin experimenting with. He comes in two flavors, hero and villain. I leave the symbolic color coding up to you.

(Right click an image and Save As to download the corresponding file.)

A few basics about this rig: Red controls are IK and Blue controls are FK. Many of the controls are more complex than the basic Translate / Rotate / Scale channels, so look in the Channel Box for custom attributes. To use them, either type in new numbers or select the number then click + drag your Middle Mouse Button in the view pane to use that channel as a Virtual Slider. Don't worry about the assignment at first: just go nuts with the rig until it starts to make sense. Enjoy!


Wednesday, January 27, 2010

Two Bouncing Balls

Your first assignment for the semester is something of a warmup. You'll be animating two bouncing balls of differing weights and sizes interacting. "Interacting" can be taken to mean either physically touching one another in motion or both hitting another movable prop in motion, like the see-saw I showed you in class today, or knocking over columns, or walls, or other props. If you are unsure of how a ball would bounce, look for references! You must have access to at least one tennis / base / bouncy / bowling ball, or some time to search around on Youtube. A little reference can go a long way in this assignment.

Try to use the "blocking" / "layout" method I showed you for this assignment: focus on setting the most basic keyframes for all objects first (S to set a key on all attributes simultaneously), without worrying so much about their timing or the quality of their motion. Just try to get a plan laid out in advance. Once all the elements are represented, you can go back and begin changing your timing by dragging keyframes around in the graph editor (middle mouse button with the Translate Tool active) and adding additional layers of motion like squash / stretch and roll.

Shoot for a total length of between 3 and 6 seconds for this assignment. That means at 24 frames per second you would have a total run time of between 72 and 144 frames, but probably much closer to 72. This is just a suggested length though, not a rule. Adjust your time sliders accordingly when you begin blocking your animation.

Remember to use the Referencing system and Project Folder organization we've talked about in class. The previous two posts on this blog cover those in more detail if you've forgotten anything.

When you're all finished with your animation, archive your project folder with all the scene files in it. It shouldn't be over a megabyte or two, so attach it to an email and get it to me before class on Monday.

Tuesday, January 26, 2010

Referencing!

For most of the projects this semester you won't be animating directly in the file where your characters / props / whatever were created. You'll be animating in a new file which will contain references to all your assets.

To make this happen, open up a fresh scene in Maya. Save it to your project/scenes directory with a descriptive name (something including "animation" or "anim" is a helpful way to distinguish it from a "rig" or "model" file), then go to File --> Create Reference... Find the file where you created and rigged whatever asset you are animating (a bouncing ball, a character, etc), and select it. Press Reference.


Viola! Your character appears in your new scene file, ready to go. The original file, however, is preserved intact and when you modify it in the future (painting weights, adding textures, adding more controls, etc) your animation file will automatically update!

Happy hunting.

Sunday, January 24, 2010

Project Mangement!

Maya utilizes a particular "project" directory system to help you keep things organized. It's a great help when you start working with multiple files on a project and we'll be using it throughout the semester to stay organized.

In Maya, to create a project for your work go to the File menu --> Project --> New... A dialog will appear with a number of text fields for you to enter. Here you can determine the names of directories within your project and tell Maya where to store files of a given type by default. I recommend that, instead of entering any of your own directory names you simply press the Use Default button at the bottom of the dialog. Notice that Maya fills in all those text fields for you now, greatly simplifying the process.


Now enter a name for your project in the uppermost field. Feel free to use whatever name you would like, but try to make it descriptive, like "jed_assignment_1" or "jed_ball-bounces" or something. Putting your name in the title is a great way to keep me from losing your files. Finally, choose a location for your project by pressing the Browse... button and save it to wherever you like.

However you choose to name things, when you have a working project directory you should be able to save files to it. By default now when you save a file it will go to your project/scenes directory. Very convenient! When you sit down at a new computer though, Maya won't necessarily know what project it should be working within, so you'll have to tell it. From now on, every time you open a copy of Maya for the first time that day you should go to the File --> Project --> Set... command and choose your project directory from the browser dialog which pops up to point Maya in the direction of your files.

When you submit files to me after this you'll want to make a .zip copy of the entire project directory.

Welcome Home.

Hello class!

This blog will be your new home-away-from-class for the next 3.5 months. Come here any time you don't remember what was assigned/when it's due, or when you want to ask a question for the whole class to see. You should feel free to post works in progress (WIPs) in the comments section, as well as discuss amongst the group. I encourage everyone to add the blog + comments to their RSS feed, but if you don't use such things I will email out any major posts when they are made. If you need to review material from last semester I recommend reading over the Art374 blog. All the intro assignments are still up there and waiting to refresh you on basic concepts.

Assignments will all be turned in via email by midnight of the night before they are reviewed in class. So if an assignment is due on a Monday, you should get it in to me by Sunday at 11:59 for full credit. You should send a zipped project folder containing all your models/textures/rigs/sets/whatevers to me at jedmitchell@art.umass.edu.

At some point your project folders will probably get too large to send via email and I'll set up an FTP server for uploading to, but that won't happen for several weeks. In the mean time, everyone have fun diving back into Maya!

Jed